GST was introduced on 1st July 2017 in India. With this, marketers/ shopkeepers/ businessmen are expected to generate GST receipts/ invoices for clients. With that, we have one of India’s biggest monetary reforms. One of the primary motives for this is that it eliminates the cascading tax impact, making the lives of businessmen and investors less complicated and one of the evaluations being that India wasn’t prepared (technically), yet, for this sort of huge change.
Utilization of the WordPress+WooCommerce combo is at huge and loads of marketers use this aggregate for e-trade across the globe. With GST in India — at the time of writing this article, there’s no documented solution for GST implementation in WooCommerce. How will we understand?
Now, like any other person using WordPress with WooCommerce, I looked for a solution in the form of a plugin. I did just that. After spending some time searching, I realized that there is no documented solution available at the moment. Outside of the WordPress context, there are a lot of other software’s, across various domains, some of them are yet to be updated to handle this in India. Surprisingly, my search for a solution for GST in WordPress availed no perfect results.
Today, I will try to explain how to do the most basic setup for GST in India on WooCommerce in WordPress. Please note, that I’m stressing on basic. It may not cover all your expectations, but it will keep you in compliance with GST and you will not face losses because you couldn’t charge GST, at least. And yes, you do not need to install an additional plugin while using this solution. Also, there are more advanced, automated methods to do this, in case your needs are larger, or more complex, buts lets discuss that at the end of the post.
This method of setting up GST in WooCommerce would help you if you’re one of these people:
- Don’t wish to change the prices of all the products in their WooCommerce store to include GST.
- Are looking for a quick-fix implementation of GST and IGST in their WooCommerce store.
- Wish to just charge GST for Indian customers; but not customers abroad.
Before we begin, here’s a glance at what we will achieve by the end of this article:
- GST/IGST will be calculated automatically during checkout
- GST/IGST will be shown on the invoice
- How to add GSTIN number to the invoice
A lot of things are easier when explained using a scenario. So, let us take an example scenario:
Let us assume, the client has a couple of brick-and-mortar apparel stores in Maharashtra spread across multiple cities and their e-commerce website has 200+ products. They ship products pan-India. This brings GST (which is CGST+SGST) and IGST (Integrated GST) into the picture. The client also ships their products abroad.
Let’s begin. Stepwise:
-
- Login to WordPress and head over to WooCommerce > Settings

- Visit the Tax tab in once you’re there. And set the following settings as shown in the image

Here, if you wish to show prices inclusive of GST during checkout, select ‘Including Tax’ in the ‘Display Prices During Cart and Checkout’ option - Now, head over to Standard Rates; link to which is right under the Tax tab

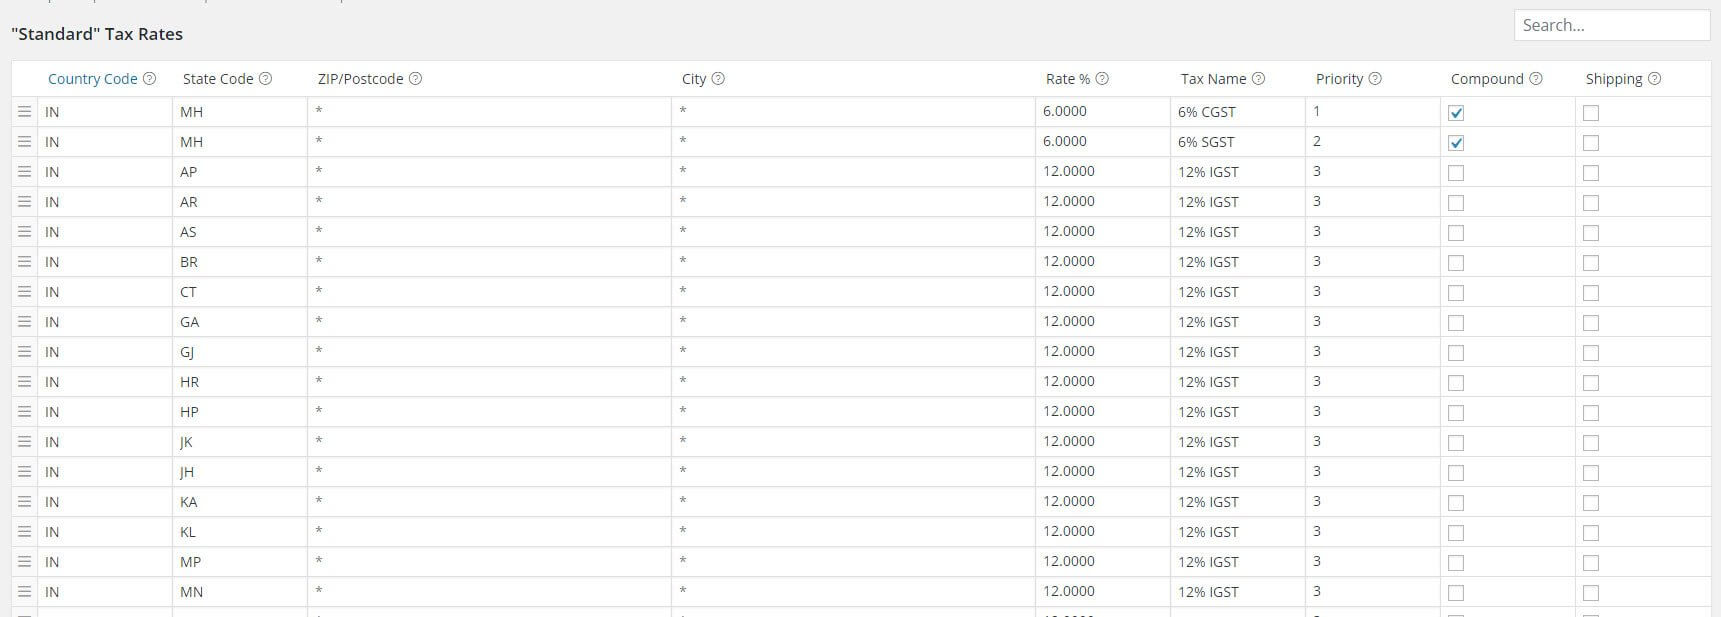
- Download this file (gst_woocommerce_tax_rates.csv) and upload it using the ‘Import CSV’ option. It contains all the state codes and the rates considering Maharashtra as the shop location for Apparels over Rs. 1,000 which is 12% for GST (CGST+SGST) and IGST; so, modify the CSV file accordingly and then upload. Considering the various possibilities, I’ll leave that to you.
Please cross-check the tax rates yourself, to be sure, This is an import file I used from the internet, though most of it looks fine to me, the rates may vary. Once done, you’ll see that all the tax rates are imported.
- Finally, you need to display your GSTIN number on your invoice.
While the GST setup didn’t require a plugin in our GST setup guide, to display your GSTIN number on the invoices, you’re going to need to install a free plugin: WooCommerce PDF Invoices & Packing SlipsRemember, you need to uninstall any other PDF invoice generating plugin for this to work.Apart from helping you to add the GSTIN number to your invoice, it will also help you to generate, print and send PDF invoices and packing slips (and much more which can be read here) — which is great, isn’t it! Once you have installed the plugin, visit the plugin’s settings page and fill in all the necessary information.Next, simply follow the screenshots:
- Login to WordPress and head over to WooCommerce > Settings
- Visit the Template tab in the settings. (You’ll find it under WooCommerce > PDF Invoices)

2. Scroll down, till you see the field with ‘Footer Terms & Condition etc’. In the text field, simply type ‘Our GSTIN is: ’

You’re set!
That’s all. Congrats, your e-commerce shop using WooCommerce in WordPress is set for GST in India. Well, a basic setup, but it’s got you covered for now. If you have multiple tax slabs applicable, continue reading.
Depending on your template, your customers will see the results during checkout.
If your products have multiple GST/IGST slabs applicable basis the price, follow these steps:
The steps mentioned below are for clothing items, wherein if price >1000, 12% GST/IGST is applicable and if price < 1000, then 5% GST/IGST; you can adapt it to your rates. Click on the links to view the screenshots:
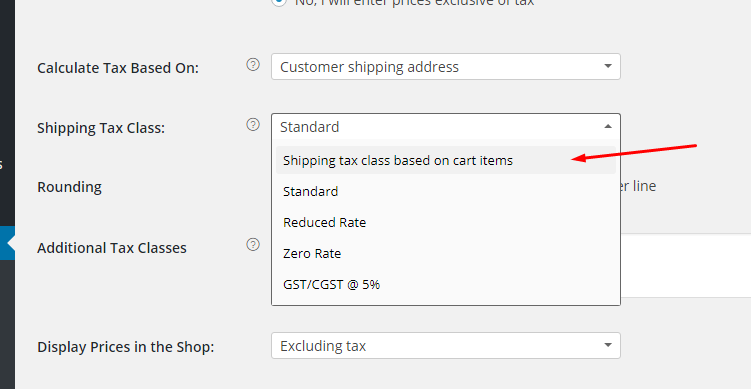
1. Select the ‘Shipping tax class based on cart items’ option here:

2. Then, define a new tax:

3. Configure it:

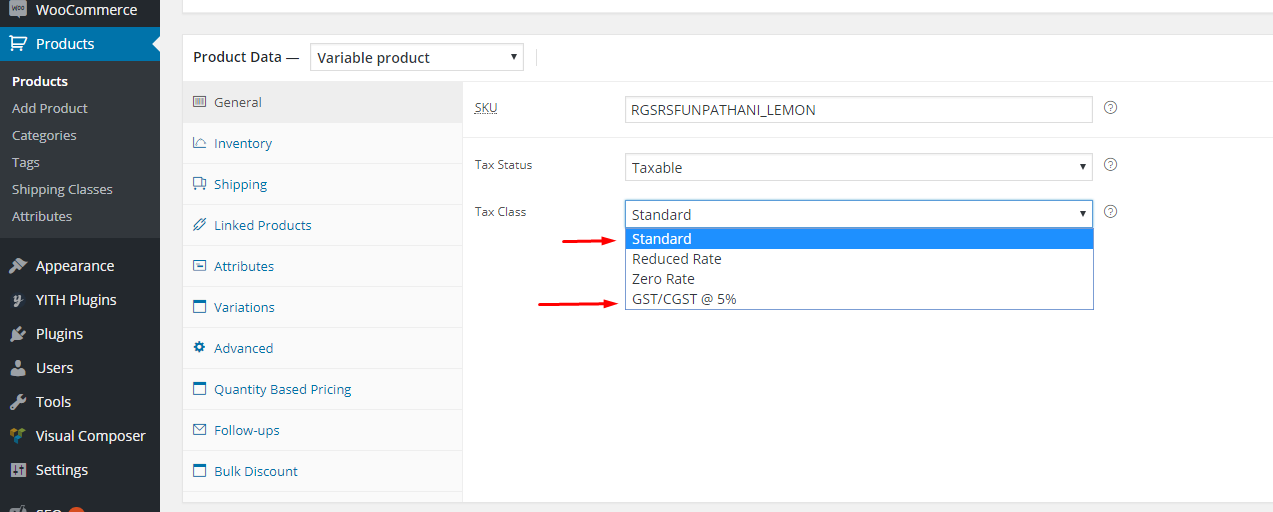
4. (If you have large no of products, go to point 5) Go to each product in your store, edit it and select the tax class:

(if you have followed the article and done the setup for the Standard tax, select Standard for products with price > Rs. 1,000 and the new one for price < Rs. 1,000).
5. Bonus tip: Here’s how you can expedite your tax class allocation in WooCommerce. Did you know that you can assign tax classes to your products in bulk? Simply use the bulk edit feature already available in WordPress and you’ll save a lot of time. Use filters at the top of the products view as needed to sort products and also sort by ascending/descending etc. See screenshots below:
![]()
![]()
Here are some screenshots from our example website:
Case 1: Selected the State in Shipping Address as Tamil Nadu; IGST should get calculated.
![]()
Case 2: Selected the State in Shipping Address as Maharashtra (this is also the base location of the store); Thus, GST (CGST+SGST) should get calculated.
![]()
P.S: Neither I am a tax expert nor a lawyer, so please consider this as a set of steps to use when you know what tax rates are applicable to the products you are selling. This article can help you configure tax, not determine how much.
Now, here is the bonus 🙂
Avalara helps you automate all your indirect taxes, including GST (CGST+SGST). Obviously, its a paid service and should be worth taking a look if your needs are likewise.
Here are some links you may find helpful in that context:
Avalara announces trustfile GST support
AvaTax for WooCommerce – Automated sales and use tax compliance
https://www.avalara.com/integrations/woocommerce/
The WooCommerce team also has a plugin on their official site to help with this integration:
https://woocommerce.com/products/woocommerce-avatax/
Documentation for WooCommerce AvaTax
Header Image:StartupChoice.com
